前言
之所以我选择折腾,因为家中正好有一个闲置的天猫精灵方糖(多年前参加阿里云活动的奖品),在网上搜索后发现,想实现 TTS & 播放自定义音乐,目前并没有能够开箱即用的集成 / 插件。
当然如果你有米家系列的音箱,可以直接用 Miot 集成,直接就实现了 TTS 功能,不需要折腾。米家的智能家居生态还是不错的,有很多开发者参与其中做贡献。
概述
TTS 实现方案
- 调用百度API将文本转换成语音(使用 HA Baidu Integration)
- 将转换好的语音文件发送给 mopidy-mpd (使用 HA Music Player Daemon (MPD) Integration)
- mopidy-mpd 将音频文件输出到蓝牙音箱
sequenceDiagram
    Home-Assistant->>+Baidu-API: 需要转换成语音的文本
    Baidu-API->>-Home-Assistant: 转换之后的语音
    Home-Assistant->>+mopidy-mpd: 转换之后的语音
    mopidy-mpd->>BLE-Speaker: play
    BLE-Speaker-->>mopidy-mpd: success
    mopidy-mpd-->>-Home-Assistant: success
播放自定义音乐
- 使用 mopidy-local 扩展
- 使用 mopidy-iris 作为音乐播放器(更多其他选择见mopidy官网)
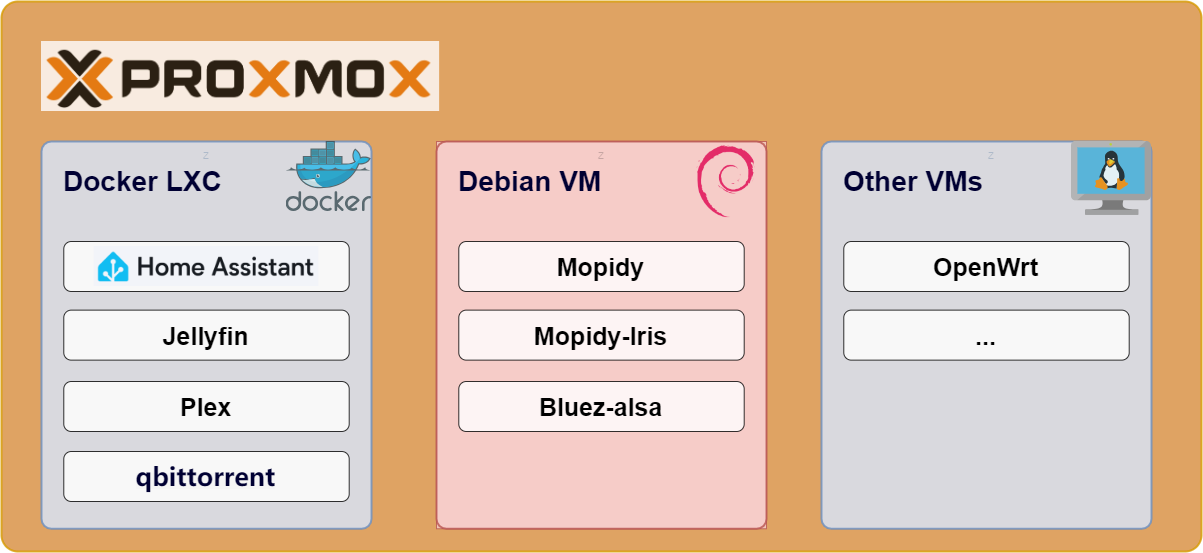
环境介绍
PVE 运行在 J4125小主机上,具体安装虚拟机 & 运行的应用如下图所示
实现流程
连接蓝牙音箱
因为我的 J4125 小主机没有带蓝牙功能,所以单独买了一个蓝牙适配器。
如果你也是跟我一样在虚拟机里面操作,记得把 USB 口直通给对应的虚拟机。
安装 bluez-alsa
它其实就是一个在 Linux 系统上用于连接蓝牙音频设备的一个工具。
官方文档上提供了基于源码的安装方式**,**我没有采用该方式进行安装,我用的名为 bluez-alsa-utils 的软件包,可以通过 apt 直接安装,方便省事。
安装方式如下:
# 1. 往 /etc/apt/sources.list 文件添加下面这一行
deb ftp.cn.debian.org/debian sid main
# 2. 使用 apt 进行安装
apt install bluez-alsa-utils
安装好后,可以使用 service bluealsa status 查看状态,显示 active (running) 说明正常运行。
接下来开始连接蓝牙音箱
# 进入 bluetoothctl
root@debian11:~# bluetoothctl
# 开始扫描设备
[bluetooth]# scan on
# 你可以使用 devices 命令查看当前可连接的设备列表
[bluetooth]# devices
Device 38:D2:CA:A3:FD:B6 方糖R(0A:6B)
# 连接设备
[bluetooth]# connect 38:D2:CA:A3:FD:B6
Attempting to connect to 38:D2:CA:A3:FD:B6
[CHG] Device 38:D2:CA:A3:FD:B6 Connected: yes
Connection successful
# 退出 bluetoothctl
[bluetooth]# exit
测试播放
# 使用 aplay 播放测试的音频文件,注意mp3格式无法播放,这里用的是 wav格式的
aplay -D bluealsa test.wav
将蓝牙音箱设置为默认音频输出
配置文件内容如下,注意需要把 device 的 mac地址换成自己蓝牙音箱的
# /etc/asound.conf
pcm.!default {
        type asym
        playback.pcm {
                type plug
                slave.pcm "output"
        }
        capture.pcm {
                type plug
                slave.pcm "input"
        }
}

pcm.output {
        type bluealsa
        device "38:D2:CA:A3:FD:B6"
        profile "a2dp"
}

ctl.!default {
        type bluealsa
}

pcm.input {
        type hw
        card 1
}
配置启动时自动连接蓝牙音箱
# 编辑定时任务配置
sudo crontab -e
# 新增一行
# (crontab前加sudo表示:修改的是root的定时任务配置)
# (@reboot表示启动时执行,sleep 20 表示延迟20秒后执行)
@reboot sleep 20 && echo "connect 18:BC:5A:BD:BD:01" | bluetoothctl
重启 reboot
若上述配置都生效,使用 aplay test.wav 即可听到测试音频的声音
mopidy 的安装 & 配置
编辑配置文件
vi /etc/mopidy/mopidy.conf
以下是我的配置文件,供参考:
/# For information about configuration values that can be set in this file see:
#
#   https://docs.mopidy.com/en/latest/config/
#
# Run `sudo mopidyctl config` to see the current effective config, based on
# both defaults and this configuration file.
[core]
cache_dir = /var/cache/mopidy
config_dir = /etc/mopidy
data_dir = /var/lib/mopidy

[logging]
config_file = /etc/mopidy/logging.conf
debug_file = /var/log/mopidy/mopidy-debug.log

[local]
enabled = true
library = sqlite
media_dir = /media
scan_timeout = 1000
scan_flush_threshold = 100
scan_follow_symlinks = false
excluded_file_extensions =
  .directory
  .html
  .jpeg
  .jpg
  .log
  .nfo
  .png


[m3u]
playlists_dir = /var/lib/mopidy/playlists

[mpd]
enabled = true
hostname = 192.168.123.190
port = 6600

[http]
enabled = true
hostname = 192.168.123.190
port = 6680
zeroconf = Mopidy HTTP server on $hostname
allowed_origins =
csrf_protection = true
default_app = mopidy


[audio]
output = alsasink

[iris]
enabled = true
注意:
- 最简的配置,只要包含
[mpd]那一项即可(必须包含,才可以使能 mopidy 服务) - 默认 audio 输出使用的是
autoaudiosink****(参见 audio/output),但是为了使用蓝牙音箱,配置文件里必须添加audio项,把输出改为alsasink****。否则 Mopidy 就会把声音输出到 3.5mm 或 HDMI 接口。
Mopidy 相关命令
# 检查服务的配置, 如果有问题,最上面会有 warning:
mopidyctl config

# 查看运行状态
service mopidy status

# 启动,停止和重启:
service mopidy start
service mopidy stop
service mopidy restart
HomeAssistant MPD Intergration 配置
-
修改
configuration.yaml配置文件# 新增以下内容,需要将host改为你部署 mopidy 的服务器ip,端口不配置默认6600 media_player: - platform: mpd host: 192.168.123.190 -
重启 Home Assistant
HomeAssistant baidu Intergration 配置
-
注册百度 TTS 引用:百度语音合成注册地址,需要从中获取
app_id,api_key,secret_key下一步配置要用 -
修改
configuration.yaml配置文件tts: - platform: baidu app_id: xxxx api_key: xxxx secret_key: xxxx speed: 5 pitch: 5 volume: 15 person: 0 -
重启 Home Assistant
mopidy-iris 安装
在 HomeAssistant 侧边栏添加 pannel
还是修改 configuration.yaml 配置文件,添加以下内容
panel_iframe:
  mopidy_iris:
    title: 'Music'
    icon: 'mdi:music'
    # 需要修改成你自己部署 mopidy 的ip地址
    url: 'http://192.168.123.190:6680/iris'
使用过程中遇到的一些问题
TTS 之后恢复音乐播放
用MPD开双进程一个专业播放音乐,一个专业TTS,这样TTS就不会打断音乐了
[Unit]
Description=TTS Player Daemon
After=network.target sound.target

[Service]
ExecStart=/usr/bin/mopidy --config /etc/mopidy/mopidy_tts.conf

[Install]
WantedBy=default.target
[Unit]
Description=Mopidy music server
After=avahi-daemon.service
After=dbus.service
After=network-online.target
Wants=network-online.target
After=nss-lookup.target
After=pulseaudio.service
After=remote-fs.target
After=sound.target

[Service]
User=mopidy
PermissionsStartOnly=true
ExecStartPre=/bin/mkdir -p /var/cache/mopidy
ExecStartPre=/bin/chown mopidy:audio /var/cache/mopidy
ExecStart=/usr/bin/mopidy --config /usr/share/mopidy/conf.d:/etc/mopidy/mopidy.conf

[Install]
WantedBy=multi-user.target